Bellaina
Plugins
The plugins used in this template are described here.
Cherry Sidebars
Cherry Sidebars allows to create and manage your own dynamic sidebars.
Cherry Sidebars is a lightweight plugin for creating multiple widget areas, and outputting them on posts or pages of your choosing. Now you don't have to limit yourself to one widget area, instead you can create as many as you like. Group your widgets into multiple areas, and pick which one you want to display for a certain post or page.
The plugin can be useful for certain posts or pages, where you want your content to be different, for example you need to add a banner ad to your popular post, or a bio section to the 'About' page. Cherry Sidebars would be a perfect tool for this task.
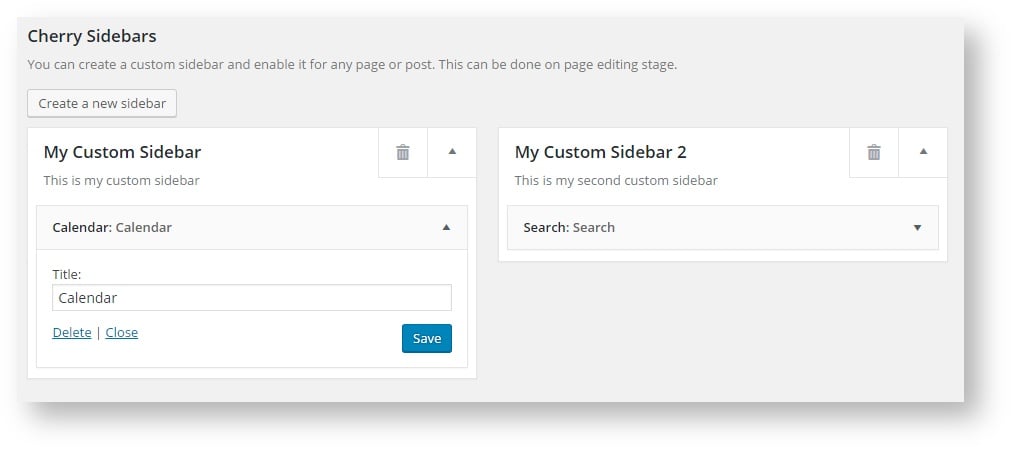
An example of two custom sidebars with the widgets.
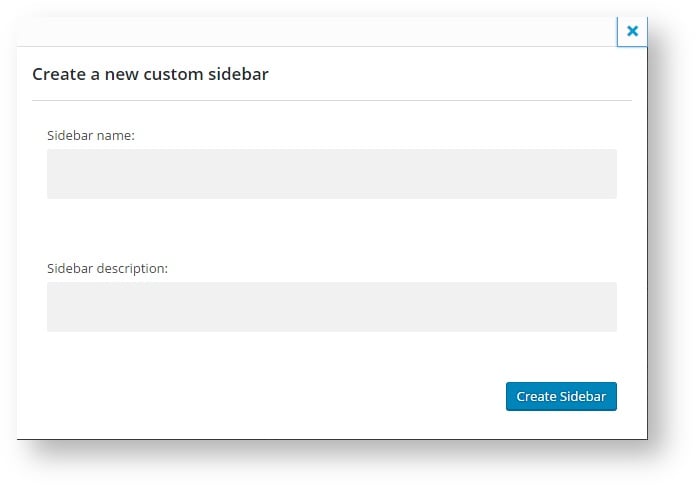
The form for creating a sidebar. Simply specify name and description for your new sidebar.
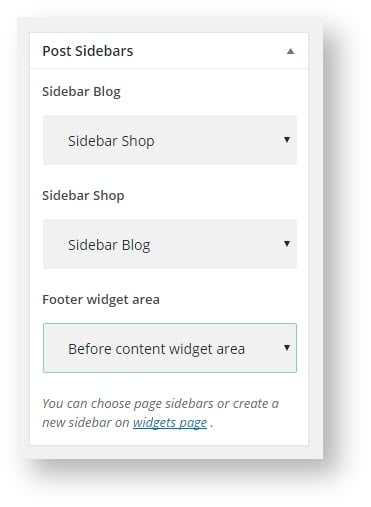
This is the sidebar manager panel that allows you to assign one of the sidebars to the current page.
Power Builder
Power builder is a brand new drag and drop page builder from TemplateMonster. It allows even non developers to build top-quality and fully functional sites for any kind of business.
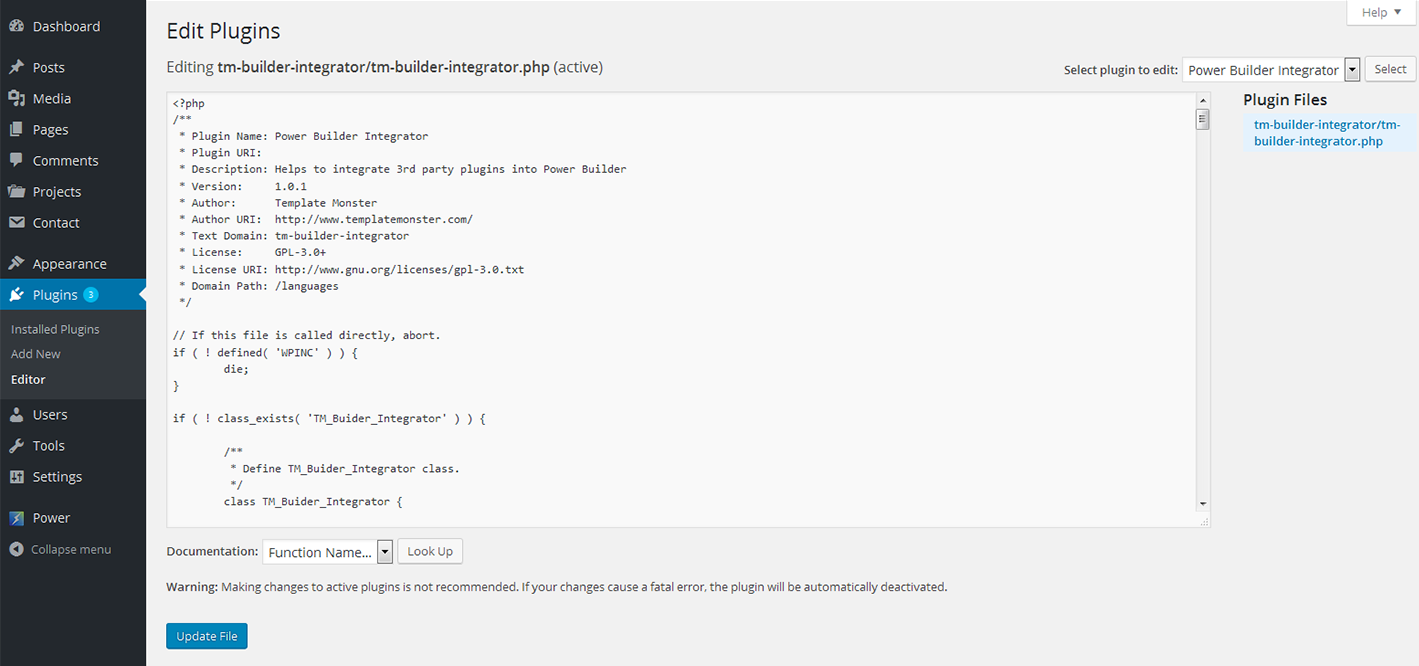
Power Builder Integrator
Power Builder Integrator is specially designed to help users integrate 3d party plugins into the Content Builder.
Cherry Real Estate
The plugin is designed for adding real estate functionality to the site. It helps users to create various kinds of real estate listings as easily as regular posts. Right after the plugin is installed, you will see the Properties menu tab in the admin panel of the website. Let’s take a look at the available options and features.

-
- Properties
- Here you can see all the available posts.
-
- Types
- In this section you can create various real estate types
-
- Tags
- Add proper tags
-
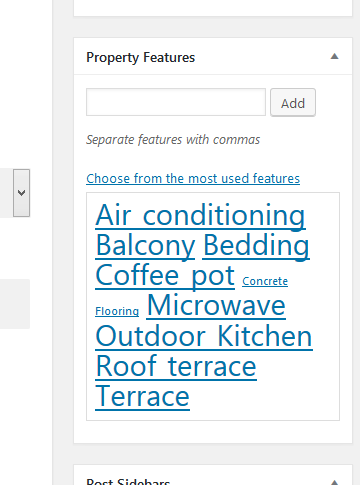
- Features
- Add all necessary features to the post
-
- Settings
- Here you can find all the settings for the plugin
Adding new post
To create a new post you need to click an Add New button in the Properties tab. On a new page enter title and text of the new property.
Now proceed to the box below. Here you need to specify:
-
- State of progress
- State of progress of the property
-
- Price
- Enter the price
-
- Property status
- Specify the property status (sale or rent)
-
- Location
- Specify the location of the apartment or office
-
- Bedrooms
- Choose the number of bedrooms
-
- Bathrooms
- Choose the number of bathrooms
-
- Area
- Specify the area of the object
-
- Area
- Specify the area of the object
-
- Parking places
- Specify the number of parking places
-
- Gallery
- Add photos of the apartment or office
Shortcodes
There are 3 types of shortcodes. To add it to the page content you need to click the button in the post admin panel.
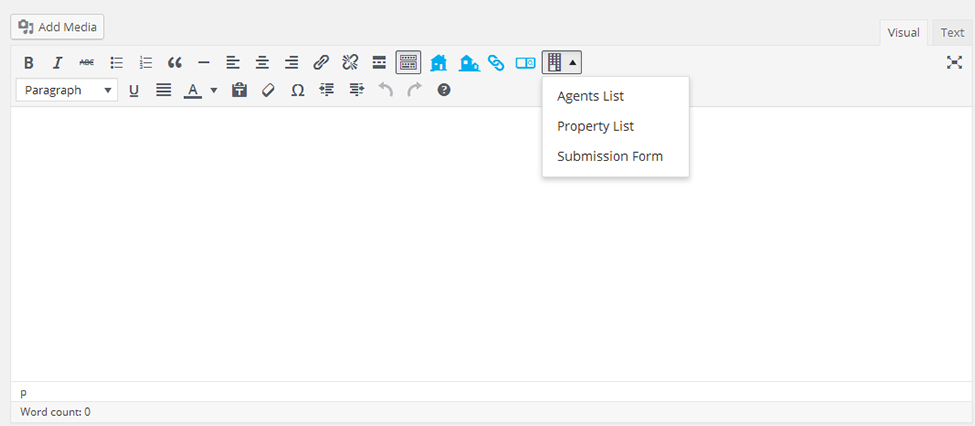
- Agent List
- Property List
- Submission Form
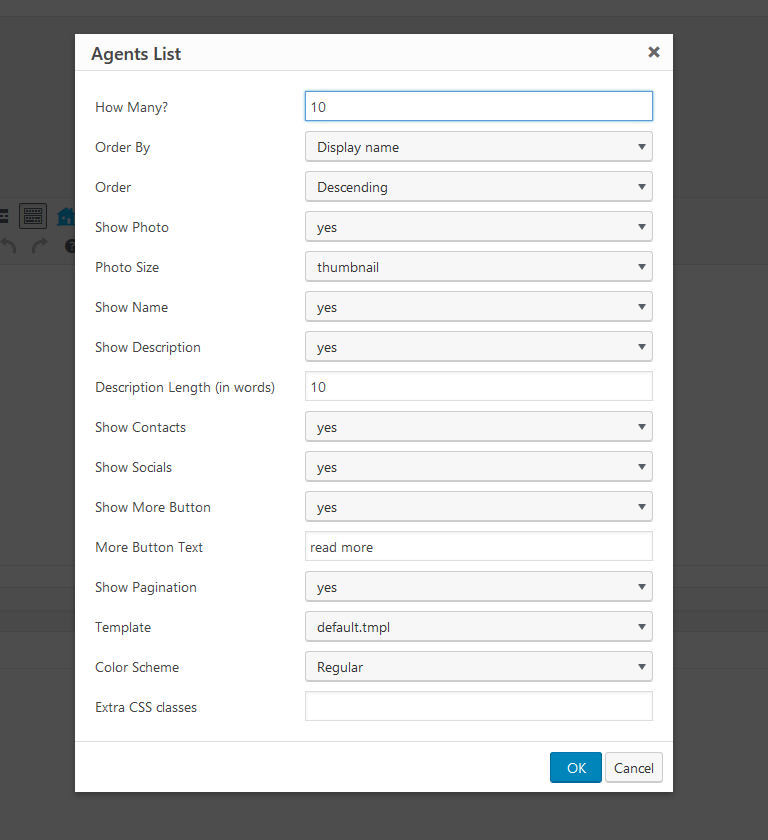
Agent list and Property list have their own popular arguments. Let’s take a look at each of them:
Agent list
Displays the list of agents on the homepage.

And on the Agents page

Here you will find all the features that will help you adjust the Agent List in accordance with the specifications of your business.
Property list
This shortcode displays the Property list on the page.
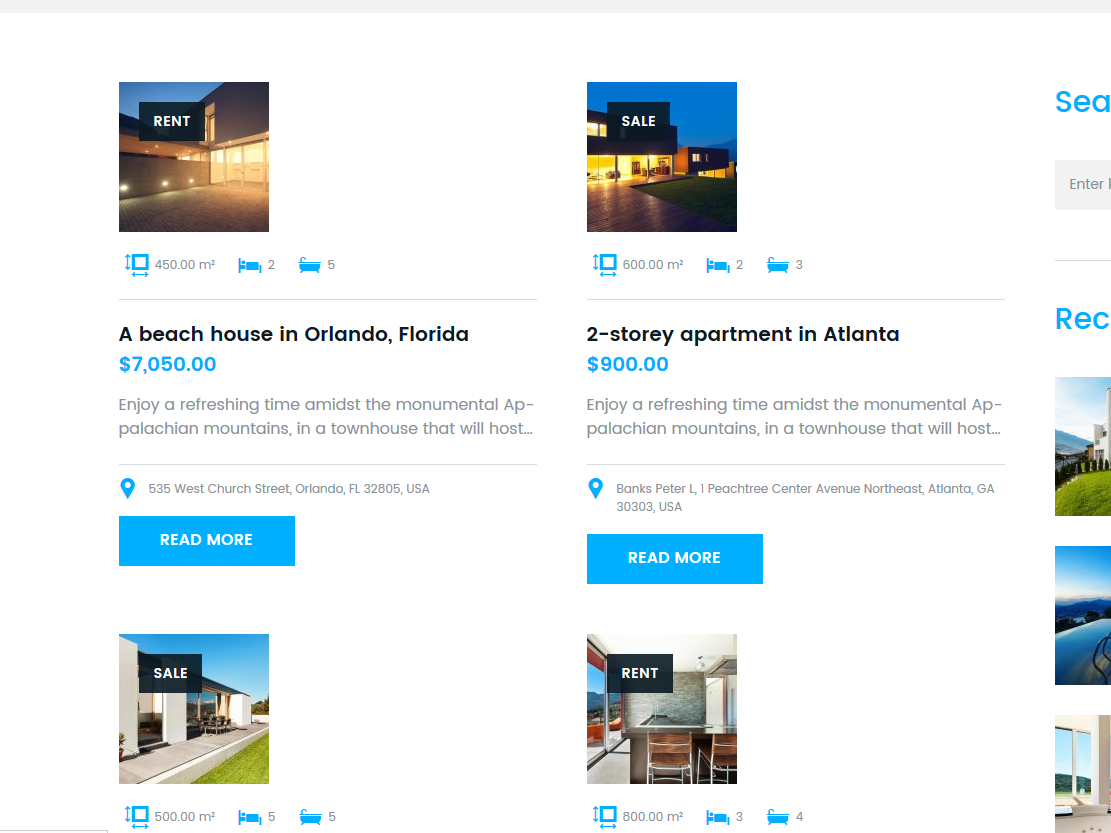
It also offers the list of options that will help you specify all the details about the properties.
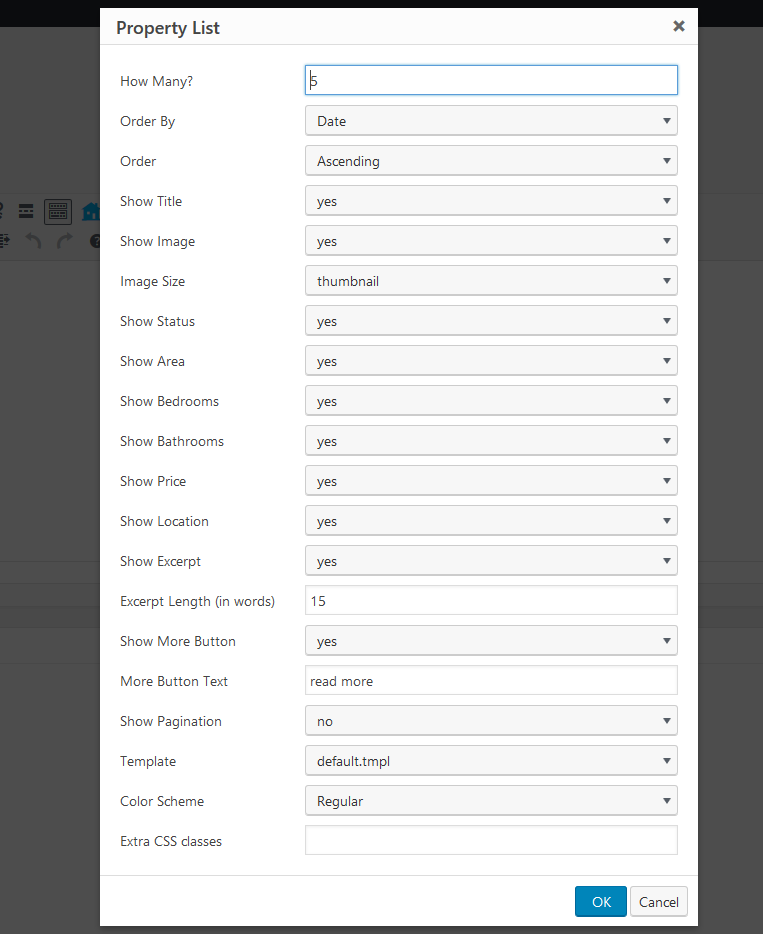
After you made all the adjustments you will see the following piece of code in the content section:
[tm_re_property_list number="5" orderby="date" order="asc" show_title="yes" show_image="yes" image_size="thumbnail" show_status="yes" show_area="yes" show_bedrooms="yes" show_bathrooms="yes" show_price="yes" show_location="yes" show_excerpt="yes" excerpt_length="15" show_more_button="yes" more_button_text="read more" show_pagination="no" template="default.tmpl" color_scheme="regular"]
You can change the settings right there without opening the popup menu again.
Submission Form
[tm_re_submission_form] shortcode adds submission form to the page.
NOTE: To change the main page for displaying the properties, you need to navigate to the plugin Settings section.
There are 2 ways to display the properties:
- Create a new page
- Add Property list shortcode
OR
- Create a new page
- Set it as a basic page for Properties page (if there is any kind of content added before/previously to the page - it will not be displayed)
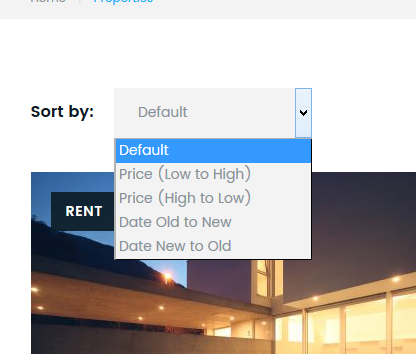
This shortcode is more flexible and allows to display particular elements hiding the other ones. All the properties are displayed on the main page, plus there is a filter for changing the layout type (list or grid list).
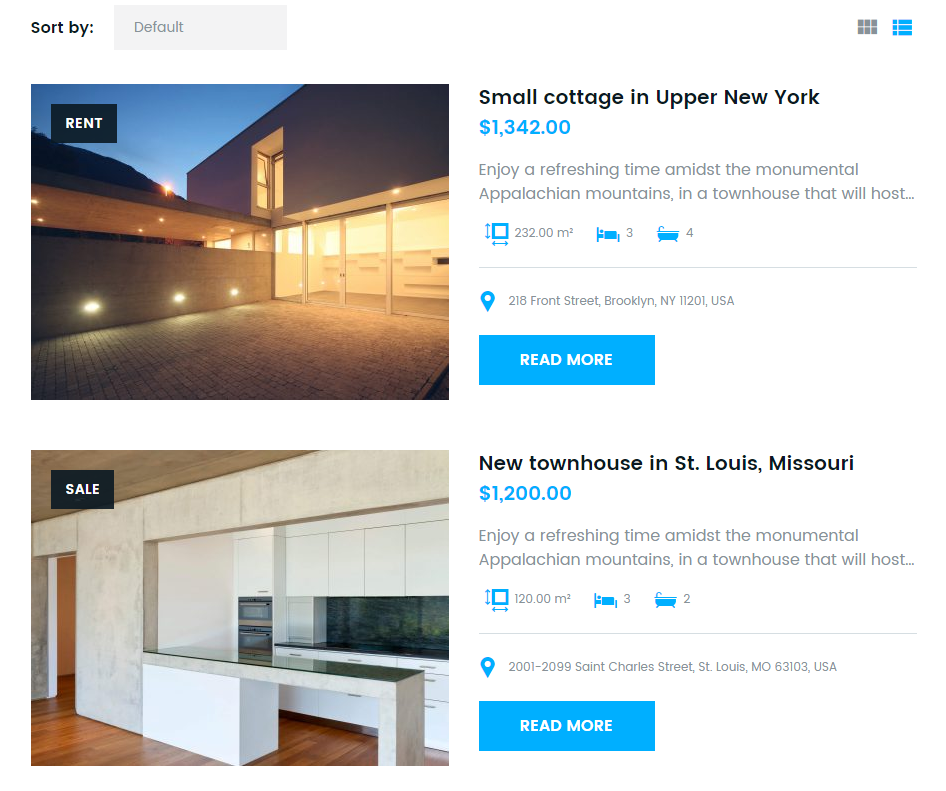
The posts can be filtered by several criteria
Options
In the Main section you can see the following settings:
Main
-
- Area unit
- Choose the metric system
-
- Currency
- Choose the currency
-
- Currency Position
- Specify the price tag position
-
- Thousand Separator
- Change the thousand separator
-
- Decimal Separator
- Change the decimal separator
-
- Number of Decimals
- Specify the number of decimals
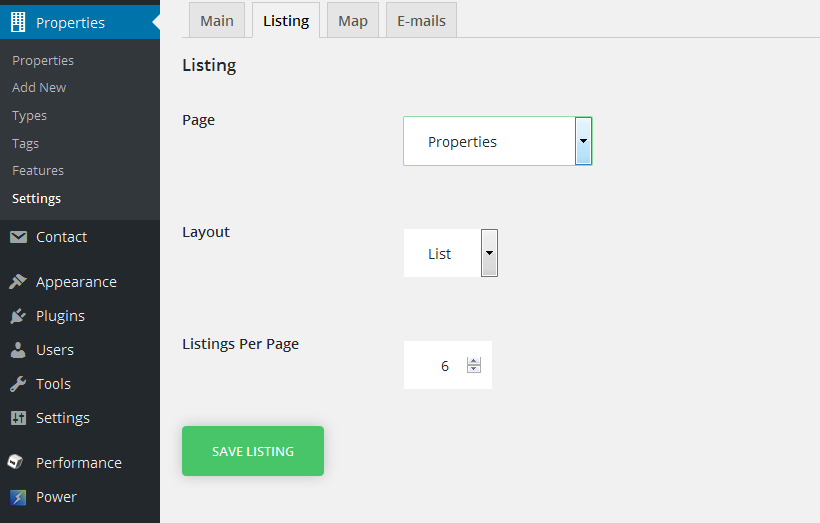
Listing
Here you need to specify the listing type.
-
- Page
- Choose the main page for displaying properties.
-
- Layout
- Change the layout type.
-
- Listings Per Page
- Choose the number of listings per page.
Map
Map Section allows you to set and adjust a map in accordance with the style of your website.
-
- Api Key
- Insert the API key generated in Google console.
-
- Style
- Change the style of the map.
-
- Marker
- Change the Google Map Marker.
Emails
Titles and notifications that will be delivered to the users who sent their properties to the site.
Widgets
At the moment there two widgets are available:
Cherry RE Properties - built as an analogue to the abovementioned shortcode. It offers the same options and can add the properties to the various widget zones.
Cherry RE Search - adds search form to the widget zone.
Search page
Search page looks like a regular property page with filters and layout types, but has a map with property markers in the top panel.
Agents
To make a registered user an agent, you should give him a certain role - RE Agent. It can be done in the standard Users section.
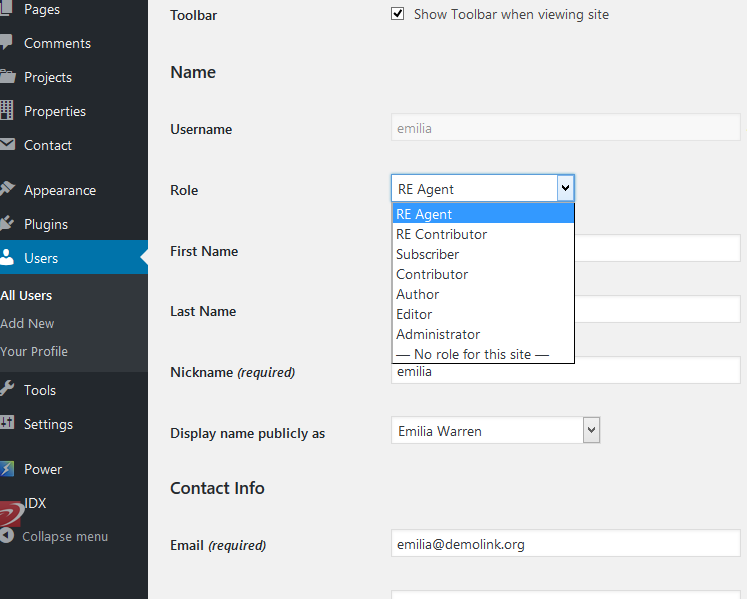
Photo options - the photo that will be displayed in the agent list, single properties or agent pages shortcodes.

To each agent you can assign as many contacts as needed.
Role specification
RE Agent - A person who can add various properties to the site, but only if approved by admin. There is also a Trusted User option that allows an agent to add properties without the admin’s approve.
RE Contributor - a person who added a property through a form to the site right after the registration procedure. For example, the user needs to sell a house, for that he takes registration on the site and add a property. Contributor can’t be a trusted User by default.
Properties
Here you can see all the available posts.
Types - In this section you can create various property types
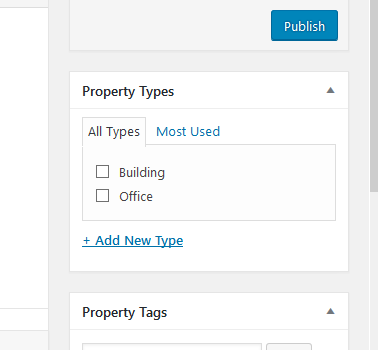
Features - Features of a property. Each of the elements is displayed as a separate link.
Cherry Projects
If you need to create various kinds of projects and display information about them on the website this plugin is exactly what you need. The plugin Cherry Projects offers a full set of options and settings that will help you to adjust the project in accordance with the specifications of your business.
-
- Projects
- Here you will see a full list of projects ever created on the website.
-
- Add projects
- Press this tab to create a new project. For that you need to perform some actions:
-
- Title
- Title of the project.
-
- Content block
- Add information about your project.
-
- External link
- Specify the external link.
-
- External link text
- Specify the external link text.
-
- External link target
- Choose a proper external link target.
-
- Projects Details
- Specify detail label and detail info.
-
- Project skills
- Add skills and specify the skill value.
Image Format options

-
- Additional images
- Add images for an Image post format.
-
- Image listing layout
- Choose a proper listing layout.
-
- Column number
- Specify the number of columns for image gallery.
-
- Image margin
- Specify margin between the images.
Gallery Format Options
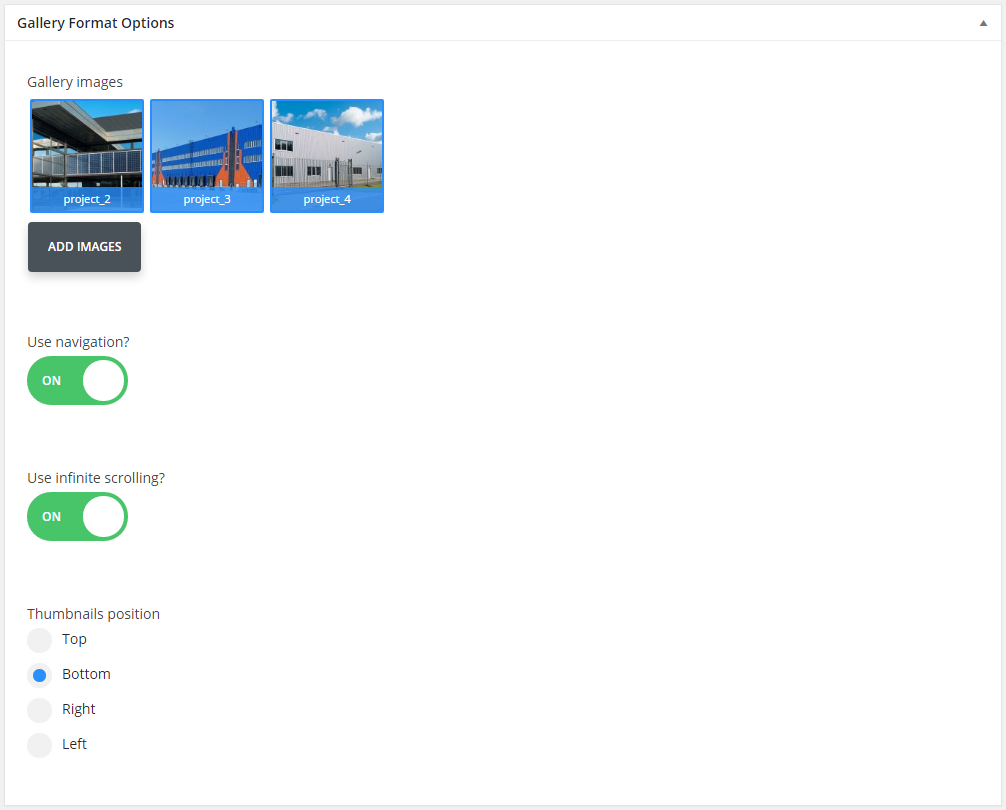
-
- Gallery images
- Add images for the gallery.
-
- Use navigation?
- Enable/disable navigation.
-
- Use infinite scrolling?
- Enable/disable infinite scrolling.
-
- Thumbnails position
- Choose a thumbnail position.
Audio Format Options
-
- Audio Source
- Choose proper audio files.
Video Format Options
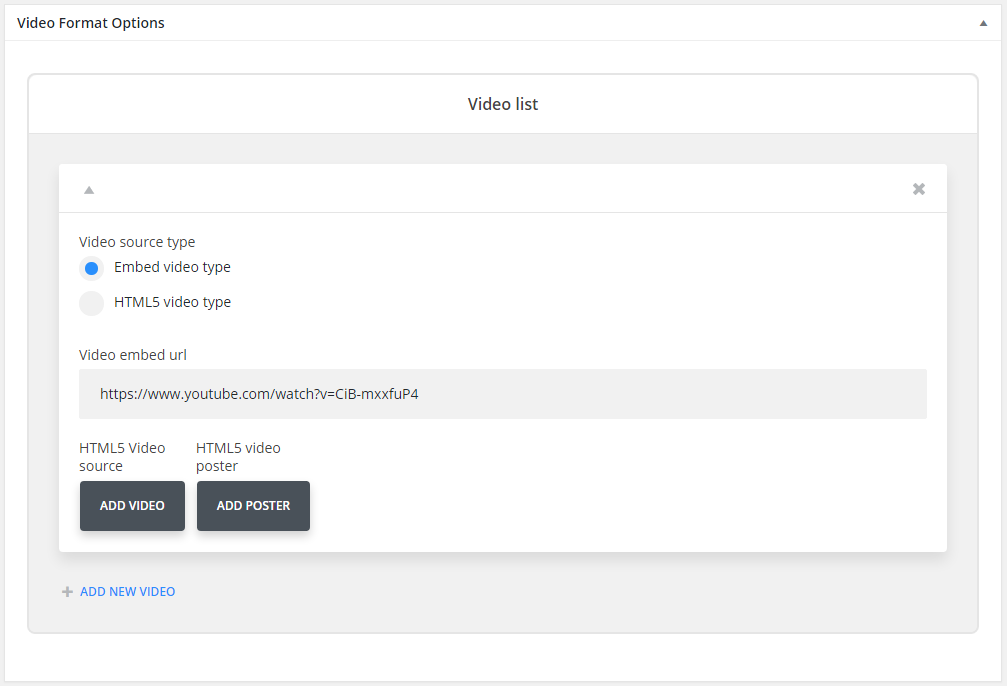
-
- Video source type
- Choose a proper video source type.
-
- Video embed url
- Enter video URL.
-
- HTML5 Video source
- Add video file.
-
- HTML5 Video source
- Add video poster.
-
- Categories
- Here you can find and create categories for the posts.
-
- Tags
- Specify the tags for projects.
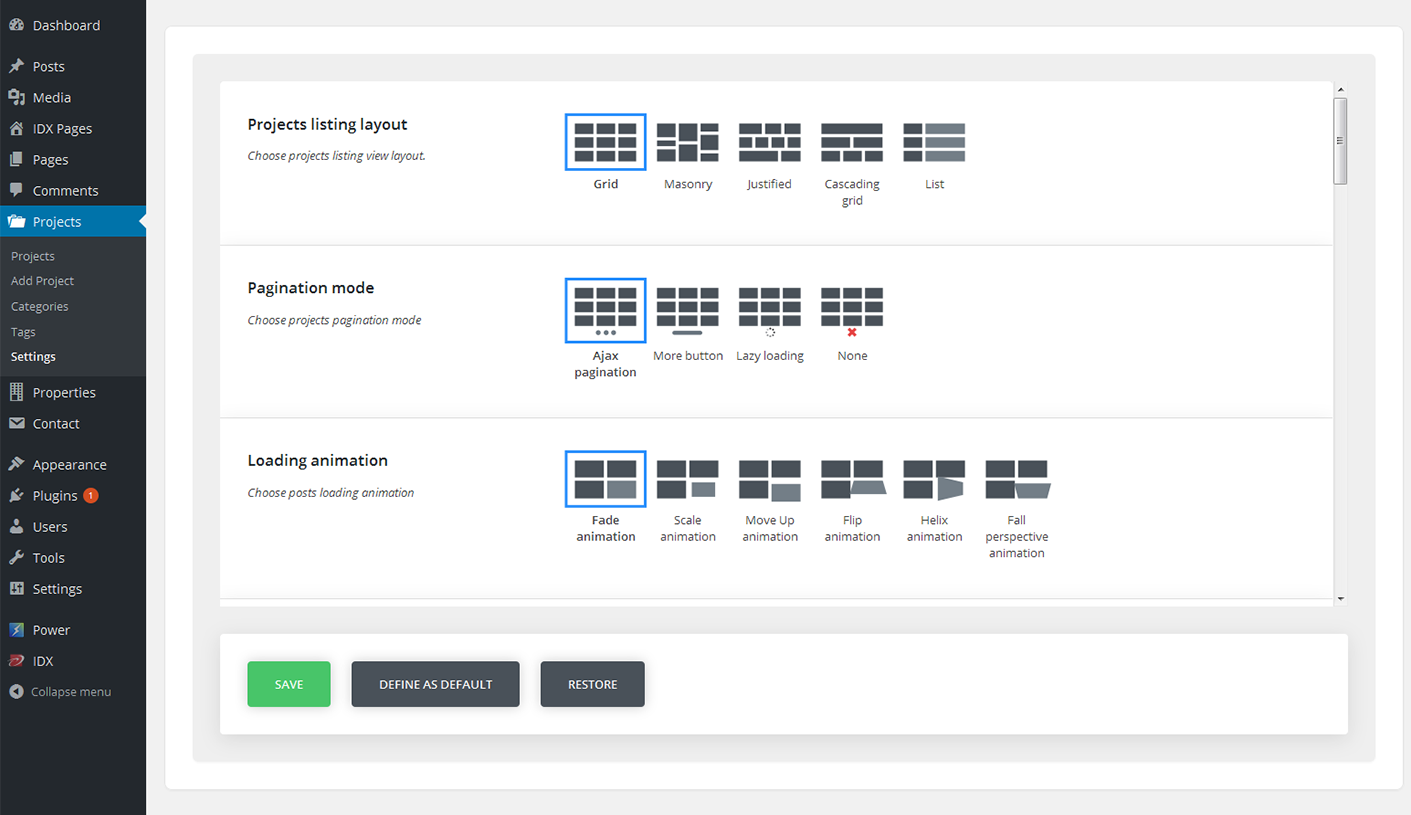
Settings
In this section you can find all the plugin settings
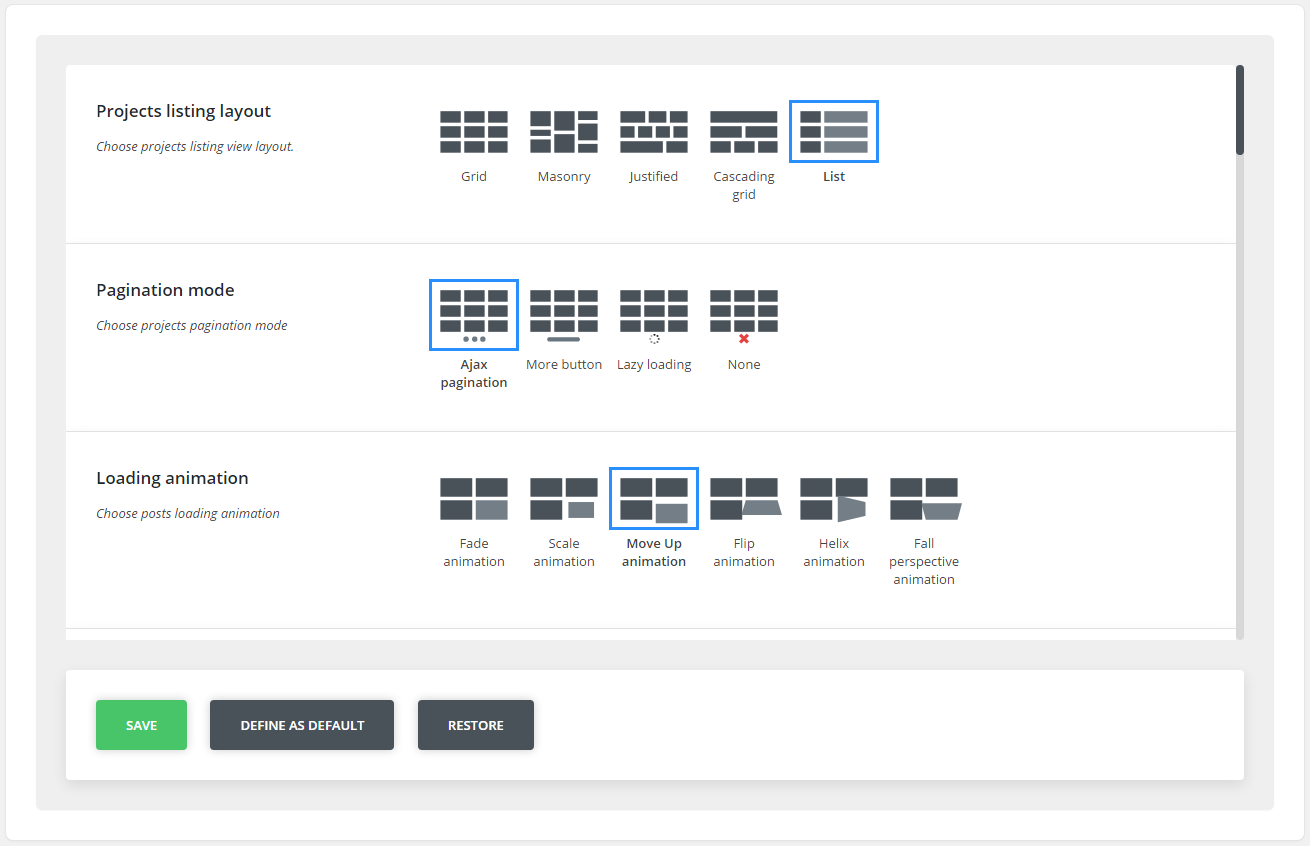
-
- Projects listing layout
- Choose projects listing view layout.
-
- Pagination mode
- Choose projects pagination mode.
-
- Loading animation
- Choose posts loading animation.
-
- Hover animation
- Choose posts images hover animation.
-
- Filters
- Enable/disable listing filters.
-
- Filter type
- Select if you want to filter posts by tag or by category.
-
- Projects filter categories list
- Choose filter categories.
-
- Order filters
- Enable/disable order filters.
-
- Order filter default value
- Specify the order filter value.
-
- Order by filter default value
- Choose the order criteria.
-
- Post Format
- Choose a proper post format.
-
- Column number
- Select number of columns for masonry and grid projects layouts. (Min 2, max 6).
-
- Posts per page
- Select how many posts per page do you want to display(-1 means that will show all projects).
-
- Item margin
- Select projects item margin (outer indent) value.
-
- Grid template
- Grid content template.
-
- Standard post template
- Standard post template.
-
- Image post template
- Image post template.
-
- Gallery post template
- Gallery post template.
-
- Audio post template
- Audio post template.
-
- Video post template
- Video post template.
Cherry Data Importer
This plugin will help you export posts, comments, widgets, settings etc., from one site to another. With a single click of a button the plugin generates an XML file that can be imported to another website.
After the installation the plugin adds a new block - Demo Content where you can export or import the content.
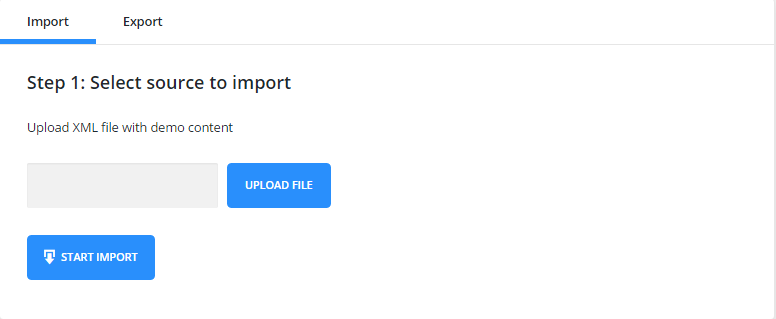
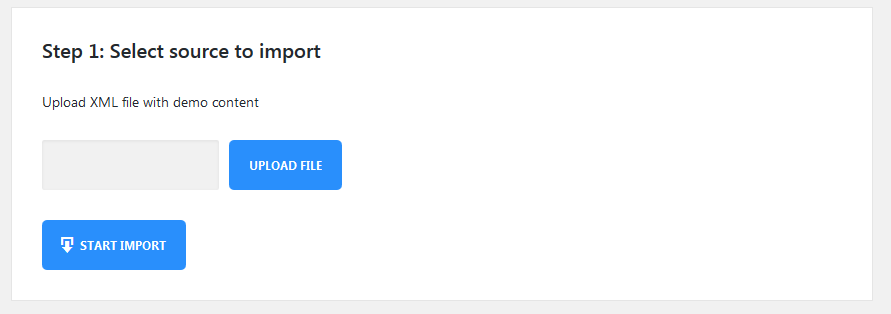
File Import
To import the content, you need to upload the XML file and press “Start Import”.
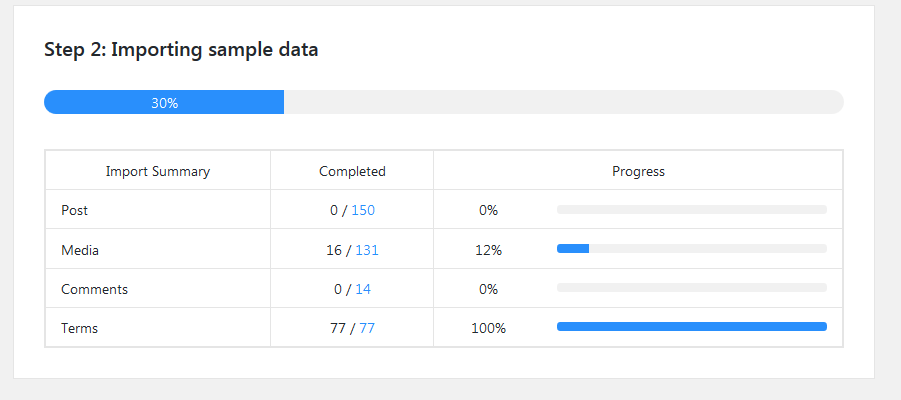
Once the import begins you will see a box with progress bars.
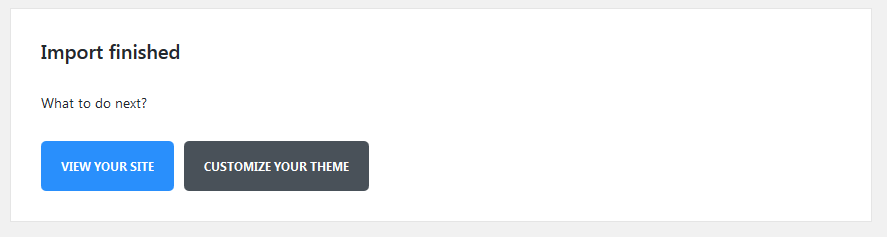
After the import is complete you can view the site or customize it.
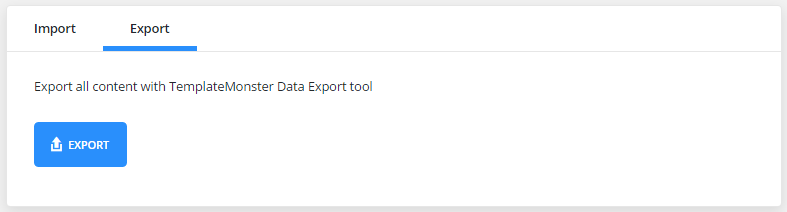
File Export
To export the data, you only need to press an Export button and an XML file will be created automatically.
Customizing plugin for a specific template
	?php
/**
 * Default manifest file
 *
 * @var array
 */
$settings = array(
    'xml' => array(
        'enabled'    => true,
        'use_upload' => true,
        'path'       => false,
    ),
    'import' => array(
        'chunk_size' => $this->chunk_size,
    ),
    'remap' => array(
        'post_meta' => array(),
        'term_meta' => array(),
        'options'   => array(),
    ),
    'export' => array(
        'message' => __( 'or export all content with TemplateMonster Data Export tool', 'cherry-data-importer' ),
        'logo'    => $this->url( 'assets/img/monster-logo.png' ),
        'options' => array(),
    ),
    'success-links' => array(
        'home' => array(
            'label'  => __( 'View your site', 'cherry-data-importer' ),
            'type'   => 'primary',
            'target' => '_self',
            'url'    => home_url( '/' ),
        ),
        'customize' => array(
            'label'  => __( 'Customize your theme', 'cherry-data-importer' ),
            'type'   => 'default',
            'target' => '_self',
            'url'    => admin_url( 'customize.php' ),
        ),
    ),
);
Array Structure
xml - XML importer settings. Features:
-
- enabled
- Enable/disable XML importer
-
- use_upload
- Show/hide the files upload form
-
- path
- Path to the pre-installed sample-data
-
- import
- Import settings
-
- chunk_size
- Number of processed items at 1 importing step. The less this number is, the more steps will be during the importing process, and less time will be spent for 1 step. For this reason, it is strongly recommended to reduce this number for the themes with large sample data to avoid problems with importing files on weak servers.
-
- remap
- Data post-processing settings. Here you need to add keys with posts IDs that can be changed during the import.
-
- post_meta
- Post metadata settings.
-
- term_meta
- Terms metadata settings.
-
- options
- Options.
export - Export Settings
-
- message
- Message displayed in the export block.
-
- logo
- URL of the logo displayed in the export block.
-
- options
- Options array for the additional export.
success-links - associative array of links displayed on successful installation page. Link ID is used as a key. The plugin contains IDs for the homepage and for customizer:
-
- label
- Link text.
-
- type
- Type of displayed button (default, primary, success, danger, warning).
-
- target
- _balnk, _self
-
- url
- Link URL.